This post is part of the series of posts on the Git and Visual Studio where we are discussing in detail on meaning of basic git operations, how to do them in Git and Visual Studio both and understand the difference of both tools. You can find the previous blog post here.
In previous blog post, we discussed what is Git Merge, types of Merging and how to achieve the same using git native commands. In this blog post, we’ll learn how to do the same by using Visual Studio.
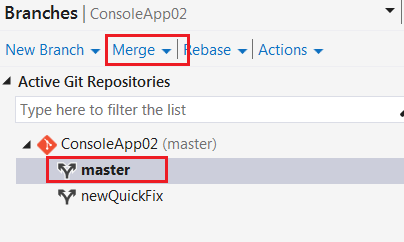
Fast-forward Merge / Simple Merge
First, let’s reset everything back to commit before merge by using git reset –hard so that we can now compare the results how we did in previous post vs using visual studio.
Now check the current git history by going to right click project -> source control -> view history:

Now, go to team explorer and select branches. Checkout master branch by double click on it. Click Merge from the menu:
Same as Git command, you need to be on master branch (target branch or branch which needs to incorporate source code changes) to merge newQuickFix branch (source branch or branch which has required source code changes):

We can also verify using git history that merge has completed indeed:

3-way Merge / Recursive Merge
First, let’s reset everything back to commit before merge by using git reset –hard. Again checkout master branch, click merge, select source branch but this time we’ll uncheck box for ‘commit changes after merging’:

Then we’ll see following window where Visual Studio prints a message asking us that a commit needs to performed explicitly:

To resolve this, go to home icon in team explorer, select changes and then click merge. This should provide a window like below where we need to click ‘commit staged’ to complete merge operation:

As we have seen earlier for recursive merge, git will create a special commit called merge commit of top of last commit. Also there is a graph which shows the commits from other branches:

Resolve Merge Conflicts
As we have seen in previous blog post that if you changed the same part of the same file differently in the two branches you’re merging together, Git won’t be able to merge them cleanly. At this point, Git will no longer perform auto merging.
To reproduce above scenario, we’ll add a file named Class06.cs to master branch and commit our changes. Note from our previous blog posts that we have also modified this file in the newQuickFix branch. Let’s try to merge these two branches using Visual Studio. It will then inform us that merge operation is in progress and it has encountered conflict for 1 file:

Let’s click on conflict to see which file is causing this issue. We can then decide if we want to keep file which was modified in source or which was modified in target:

We can also choose to compare files which would allow us to see the difference between source and target. Once we have modified file as per our requirement, we can then inform Visual Studio to take the appropriate version and complete merge.
If we now see the git history in the Visual Studio, we would see something like below:

Again, recursive merge is the only strategy followed in case of merge conflicts. So we have a special commit on top of all changes created using merge conflict.

[…] blog post is part of in-depth blog series on the Git and Visual Studio. You can find the previous blog post here. In this blog post, we’ll understand what is git rebase, how it is different from git merge […]
LikeLike
[…] Merge conflicts are quite common if multiple developers are working for the same repository. This process is same irrespective of where you have hosted the centralized git repository. To know more on the merge conflicts and steps to resolve the same, click here. […]
LikeLike
Great article. ‘Let’s click on conflict to see which file is causing this issue’ -To resolve conflicts it might be helpful to say we have to click the merge button.
LikeLike