In this post, we’ll explore how to use github(https://github.com) and few basic steps such as creating repository, making some changes and commit our changes. In this age of devops, it is an essential skills to have for IT pros as well. Not that you’ll need to start writing code in .net or node.js but github is home to most open source projects even for PowerShell code. A lot of folks have moved to put their PowerShell module/scripts on github.
To get started, you’ll need to have a account on https://github.com. Once you have created an account, you can start creating project. In github terms, a repository is equivalent of a project. You would place all code belonging to project in the repository.
To create repository, click + button from the top right page (just left to your profile pic) and then select ‘new repository’:

This will open up a form in the page. Fill in the basic details such as name for your repository such as myfirstrepo and then select checkbox for initialize my repository. This will initialize your repository with a very basic readme text file. You can edit the contents of this file later.After this click create repository button:

Once repository is created, a branch known as master branch will be automatically created for you. A master branch is where you would have perfectly working copy of your code. If you need to edit the code, you create a separate branch, modify your code, review it, discuss changes and in last when its ready, merge it with master branch. Many developers can create their own branches and when the finalize the code, they merge it with the master branch. When you create a new branch, it has a copy of all files in the master branch, so that you always have latest code to begin with.
To create a new branch, click button for branches. Provide a name and then click ‘create branch’ button:

Now once you have create branch, click on the file you want to edit. In our case, this would be readme.md file. Click on the file name and select edit from the text editor menu to start editing it:

After editing the contents, to save file you need to commit it. This will only make changes in the newly forked branch, not to the master. You can make commit as many times as you need:

When you are ready to merge code with master branch or want to review code difference, you need to create a pull request. A pull request is how you inform someone of changes made in your code, review it and then merge it. To create pull request, hope over to tab ‘pull requests’ and then select ‘new pull request’:

This will open up a compare code form in same page. Select the ‘myfirstbranch’ to compare code with the existing ‘master’ branch:
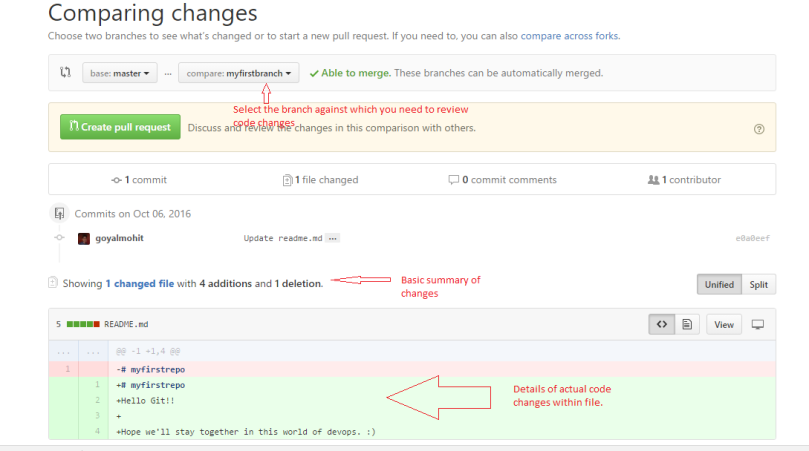
Once you are done with the review, click big green button to create a new pull request:

If you are satisfied and ready to merge code, you can use the ‘merge pull request’ button. At this point, there is no further use of the branch created. Go ahead and delete it. Optionally provide a description of changes and then close the pull request:

Note that everything in Git is check-summed before it is stored and is then referred to by that checksum. This means it’s impossible to change the contents of any file or directory without Git knowing about it. This functionality is built into Git at the lowest levels and is integral to its philosophy. This is a 40-character string composed of hexadecimal characters (0–9 and a–f) and calculated based on the contents of a file or directory structure in Git.
You will see these hash values all over the place in Git because it uses them so much. For example in our case, if you click for history of commit changes, you should see something like this:

In fact, Git stores everything in its database not by file name but by the hash value of its contents. That’s pretty impressive feat.

[…] via Getting started with github — metavrse.wordpress.com […]
LikeLiked by 1 person