To run the build or deployment jobs in Azure DevOps or Azure Pipelines (formerly known as TFS and VSTS respectively), an agent is required. Microsoft provides the different types of the agents and they are hosted and managed by Microsoft only. However, it is advisable to host your own private agent for various reasons other than the cost. Microsoft provides the facility of installing agent on various OS’es like Windows, Linux, Mac OS etc. They have done a good job in terms of documentation, however you still need to perform few steps in order to set it up correctly.
However sometime ago, Microsoft started providing docker image for the agents which makes it really easy to run them as containers. If you are running agents as docker containers, you can provision them on the fly to perform the build or the release job and then remove them. This way you can utilize your resources more efficiently. In this blog post, we are going to discuss steps for the same. If you want to use agents installed in traditional way, you are covered here.
Repository Location for VSTS Docker Image
Docker images for running VSTS agents is available at https://hub.docker.com/r/microsoft/vsts-agent. Same information is also available on the GitHub at https://github.com/Microsoft/vsts-agent-docker.
As of now, Ubuntu 14.04 and 16.04 are the only supported OS’es, but there are plans for Windows support. There are many different agent images to choose from depending on your scenario (TFS, standard tools, or docker) but the one we are going to use is the image with Docker installed on it. So we would like to build docker images for our source code repository using the VSTS agents running as docker containers.
Location of Source Code used in this post
The source code used in this blog post, is a close copy of the code provided by Microsoft at https://github.com/MicrosoftDocs/pipelines-dotnet-core. The code has been modified slightly to illustrate the blog post and is available at: https://github.com/goyalmohit/sample-dotnet-core-app.
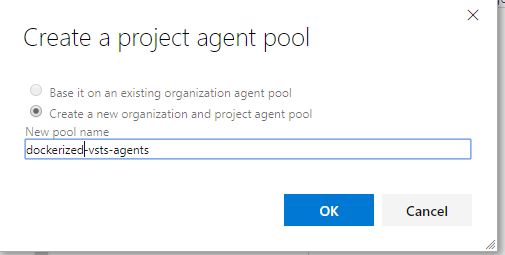
Create a Private Agent Pool
We’ll need to create an organization agent pool, a project level agent pool and a queue. This all can be created in one step by going to project settings -> agent pools:
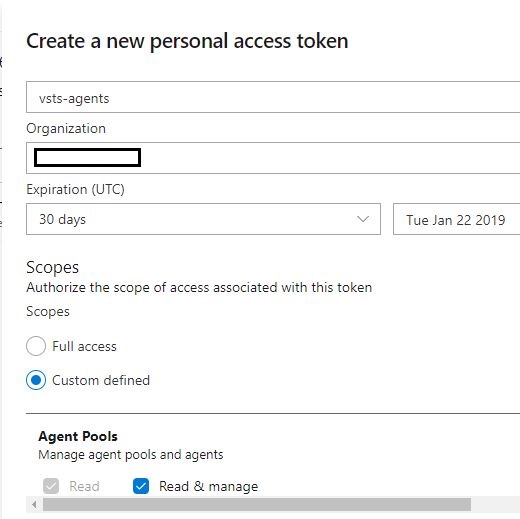
Create a Personal Access Token
A personal access token or PAT is required so that an machine can join the pool created above with the Agent Pools (read, manage) scope. We can create the token from our profile:
Configure a Continuous Integration Pipeline
We can use below azure-pipeline.yml to create the CI pipeline in the Azure Pipelines / Azure DevOps:
This file contains bidirectional Unicode text that may be interpreted or compiled differently than what appears below. To review, open the file in an editor that reveals hidden Unicode characters.
Learn more about bidirectional Unicode characters
| # Build Docker image for this app using Azure Pipelines | |
| pool: | |
| name: 'dockerized-vsts-agents' | |
| variables: | |
| buildConfiguration: 'Release' | |
| imageName: 'dotnetcore:$(Build.BuildId)' | |
| steps: | |
| – script: | | |
| dotnet build –configuration $(buildConfiguration) | |
| dotnet test dotnetcore-tests –configuration $(buildConfiguration) –logger trx | |
| dotnet publish –configuration $(buildConfiguration) –output out | |
| docker build -f Dockerfile -t $(dockerId)/$(imageName) . | |
| docker login -u $(dockerUser) -p $pswd $(dockerId) | |
| docker push $(dockerId)/$(imageName) | |
| env: | |
| pswd: $(dockerPassword) | |
| – task: PublishTestResults@2 | |
| condition: succeededOrFailed() | |
| inputs: | |
| testRunner: VSTest | |
| testResultsFiles: '**/*.trx' |
We’ll need to define the three variables: dockerUser, dockerPassword and dockerId from the UI section in the azure pipeline. Here, the dockerUser and dockerPassword provide the connection information for the container registry: dockerId. Do note that we have specified agent pool name as the one created above.
Choose VSTS Docker Image Version
The next important step is to select the correct version of the docker image based on the Ubuntu OS version i.e. 14.04 or 16.04 and based on whether you need to run in for TFS or Azure Pipeline. Once this is decided, you need to further choose image on the task that you need to perform. There are further 3 types of images:
- Standard Images – These derived images include a set of standard capabilities that enable many of the built-in VSTS build and release tasks.
- Docker Images – These derived images include a version of the Docker CLI and a compatible version of the Docker Compose CLI. This image cannot run most of the built-in VSTS build or release tasks but it can run tasks that invoke arbitrary Docker workloads.
- Docker Standard Images – These derived images bring together a docker image and a standard image.
Note that none of the derived images can run “Docker in Docker”, but rather re-use the host instance of Docker. To ensure this works correctly, volume map the host’s Docker socket into the container by using -v /var/run/docker.sock:/var/run/docker.sock.
Run the VSTS Docker Image to build Source Code
Since none of the derived images can run “Docker in Docker”, we cannot build source code directly insider docker container. This is because source code is downloaded inside container, but docker daemon is being utilized from host machine.
There is an environment variable called VSTS_WORK that specifies where the work should be done by the agent. We can change the location of the directory and volume mount it so that when the docker container runs on the host it will have access to the files.
To create an agent that is capable of using docker in this way, we have to run docker container with below params:
This file contains bidirectional Unicode text that may be interpreted or compiled differently than what appears below. To review, open the file in an editor that reveals hidden Unicode characters.
Learn more about bidirectional Unicode characters
| docker run \ | |
| -e VSTS_ACCOUNT=<youraccountname> \ | |
| -e VSTS_TOKEN=<your-account-Private-access-token> \ | |
| -e VSTS_AGENT='$(hostname)-agent' \ | |
| -e VSTS_POOL=dockerized-vsts-agents \ | |
| -e VSTS_WORK='/var/vsts/$VSTS_AGENT' \ | |
| -v /var/run/docker.sock:/var/run/docker.sock \ | |
| -v /var/vsts:/var/vsts \ | |
| -d microsoft/vsts-agent:<docker-image-name> |
The important command here is -e VSTS_WORK=/var/vsts which tells the agent to do all the work in the /var/vsts folder. Then volume mounting the folder with -v /var/vsts:/var/vsts enables you to run docker containers inside the VSTS agent and still see all the files.
Once the container is started, the appropriate agent version is automatically determined and downloaded and agent is joined into the agent pool specified. We can then view the same from agent pool settings:

Verifying everything works
If we have performed above steps correctly, we can then perform the build and expect it to run correctly:

To verify further, that docker related steps have been run, we can open logs and they should be like below:

