Google cloud platform aka GCP is a cloud offering from Google. GCP frees you from the overhead of managing infrastructure, provisioning servers and configuring networks. To let innovators innovate and let coders, well, just code. In this blog post, we’ll get to know how to create a VM instance on GCP.
First of all, you’ll need to sign in to google cloud platform using https://cloud.google.com. If you don’t already have access, you can sign up quickly by providing few basic details. Once its done, google will automatically create a project for you and take you to the GCP Console.
You can think of a project as the organizing entity for what you’re building. A project is made up of the settings, permissions, and other metadata that describe your applications. Resources within a single project can work together easily, for example by communicating through an internal network, subject to the regions-and-zones rules. The resources that each project contains remain separate across project boundaries; you can only interconnect them through an external network connection.
Each Cloud Platform project has:
- A project name, which you provide.
- A project ID, which you can provide or Cloud Platform can provide for you.
- A project number, which Cloud Platform provides.
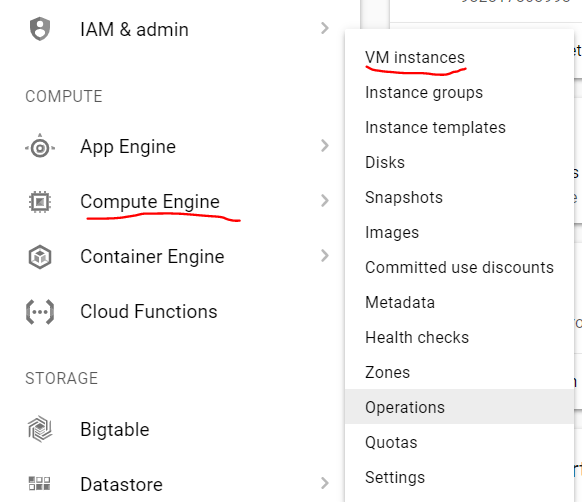
Once you are in the GCP console, from left pane, select Compute Engine and then select VM instances:
Now this will ask for few basic settings such as instance name, OS version, memory and CPU details in the central pane:
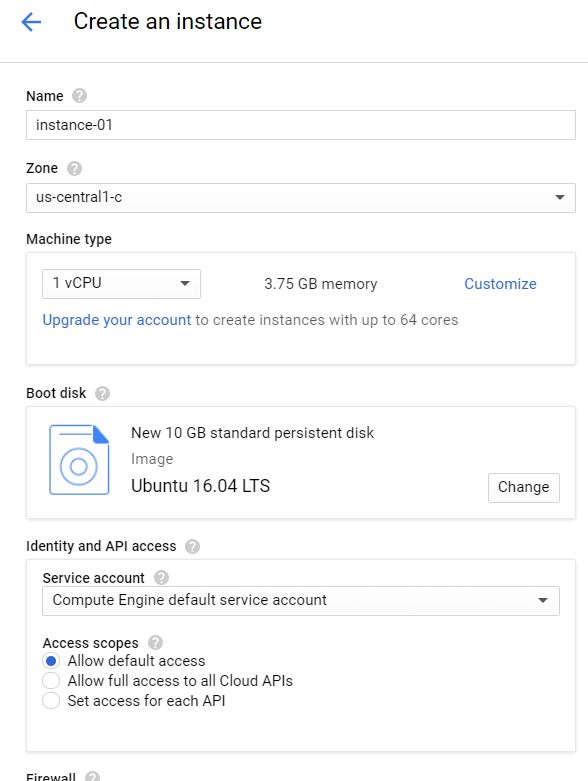
For our case, we’ll select OS version as ubuntu:

Fill in other details as required and then select create. It will take only a couple of mins to provision the VM instance. Once the instance is created, you can see basic details such as internal IP address, external IP address etc.
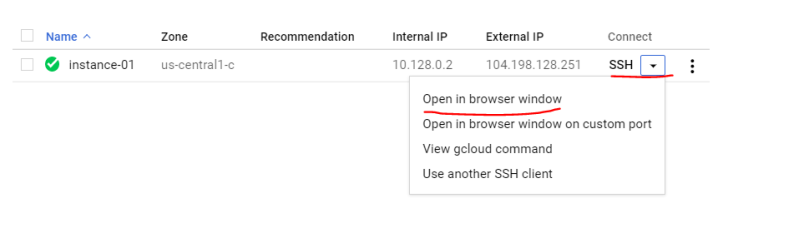
Since we have created an ubuntu-based VM instance, we can ssh to it. For this, we can copy external ip address from console and then you the same with ssh client of our choice. Or GCP also provides facility of using in-browser ssh window which is a very nice way to connect. For this, click on dropdown shown next to SSH under connect column:
It will automatically authenticate and directly opens a ssh window. We can run basic shell commands to make sure its working:

In the last, we can select certain administrative actions like start, stop or delete a VM instance. For this, we need to click on the three dots shown next to the VM instance name. For example, we can select delete option as below:

We’ll learn more about how to create VM instances using gcloud and APIs in upcoming posts.

[…] via Create a VM instance on Google cloud — mohitgoyal.co […]
LikeLike
[…] the server into an image. The last step was to deploy the Docker image inside a container on Google Cloud Platform. That’s where we’ll head to […]
LikeLike