Since in last post, we discussed on how to run Azure Pipelines agents as docker containers and configure them accordingly, the next step would be to run them on the Kubernetes platform. This kubernetes cluster can be on-premise and/or cloud and could be self managed or managed by the cloud service provider itself.
One of the reasons you may want to run them on Kubernetes is because you want better utilization of your kubernetes cluster. Another reason might be to leverage your existing knowledge of the kubernetes platform and work on it. Another reason would be to not use Microsoft hosted agents, as by default you would get only 1800 minutes of agent time to utilize, for free accounts.
Not much talked about option is the need to run testing (functional or integration testing) on the private kubernetes services which are otherwise not publicly available. So they can be accessed only from other services within the same cluster. By running a Azure Pipeline agent in the cluster, we make it possible to test any service, regardless of type. This is going to the focus for this blog post.
Provision an Azure Kubernetes Cluster
For this we’ll be using Azure CLI. Make sure Azure CLI is installed and configured on your machine.
Create Azure Resource Group
An Azure resource group is a logical group in which Azure resources are deployed and managed. It is mandatory for any resource to have an associated resource group. So the very first step is to create an Azure Resource Group.
To create the same, we can use below command:
az group create --name aksDemo-rg --location eastus
Create AKS Cluster
We can use the az aks create command to create an AKS cluster. The following example creates a cluster named aksDemo with one node.
az aks create \
    --resource-group aksDemo-rg \
    --name aksDemo \
    --node-count 1 \
    --enable-addons monitoring \
    --generate-ssh-keys
The command may take few minutes to complete as it needs to provision lots of resources. Note that monitoring for resources is also enabled using --enable-addons switch. If everything runs fine, the output will be JSON-formatted information about the cluster.
Connect to AKS Cluster
To manage a Kubernetes cluster, we need to use kubectl. It is used to connect and manage kubernetes clusters. To install kubectl locally, we can use the below command:
az aks install-cli
If its installed already, there is no need to run above command. Once its installed, we need it to connect to AKS cluster created above. For this, we can run below command:
az aks get-credentials --resource-group aksDemo-rg --name aksDemo
This will save the cluster connection information in local directory .kube. To verify, that we are able to connect to cluster, run below command:
kubectl get nodes
Make sure the status of the node, should be ready before we proceed further.
Deploy the Agent as Docker Container
Create an Agent Pool
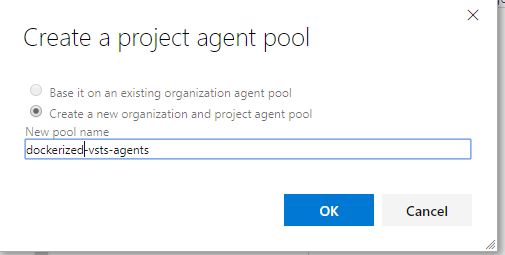
We’ll need to create an organization agent pool, a project level agent pool and a queue. This all can be created in one step by going to project settings -> agent pools:
Create a Personal Access Token
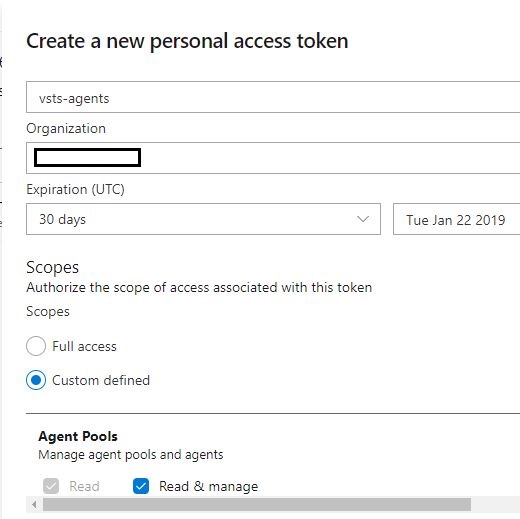
A personal access token or PAT is required so that an machine can join the pool created above with the Agent Pools (read, manage) scope. We can create the token from our profile:
Save the Token Configuration inside Kubernetes
Take the token and create a secret in Kubernetes containing the token and the account name:
kubectl create secret generic registry --from-literal=VSTS_TOKEN=Personal-Access-Token --from-literal=VSTS_ACCOUNT=AzurePipeline-Account
Replace the values in above command appropriate for your account.
Deploy the VSTS Docker Agent on AKS
For this, we can use below kubernetes configuration:
This file contains bidirectional Unicode text that may be interpreted or compiled differently than what appears below. To review, open the file in an editor that reveals hidden Unicode characters.
Learn more about bidirectional Unicode characters
| apiVersion: v1 | |
| kind: ReplicationController | |
| metadata: | |
| name: vsts-agent | |
| spec: | |
| replicas: 1 | |
| template: | |
| metadata: | |
| labels: | |
| app: vsts-agent | |
| version: "0.1" | |
| spec: | |
| containers: | |
| – name: vsts-agent | |
| image: microsoft/vsts-agent:ubuntu-16.04-docker-18.06.1-ce-standard | |
| env: | |
| – name: VSTS_ACCOUNT | |
| valueFrom: | |
| secretKeyRef: | |
| name: vsts | |
| key: VSTS_ACCOUNT | |
| – name: VSTS_TOKEN | |
| valueFrom: | |
| secretKeyRef: | |
| name: vsts | |
| key: VSTS_TOKEN | |
| – name: VSTS_POOL | |
| value: dockerized-vsts-agents | |
| volumeMounts: | |
| – mountPath: /var/run/docker.sock | |
| name: docker-volume | |
| volumes: | |
| – name: docker-volume | |
| hostPath: | |
| path: /var/run/docker.sock |
Verify the Agent is connected fine
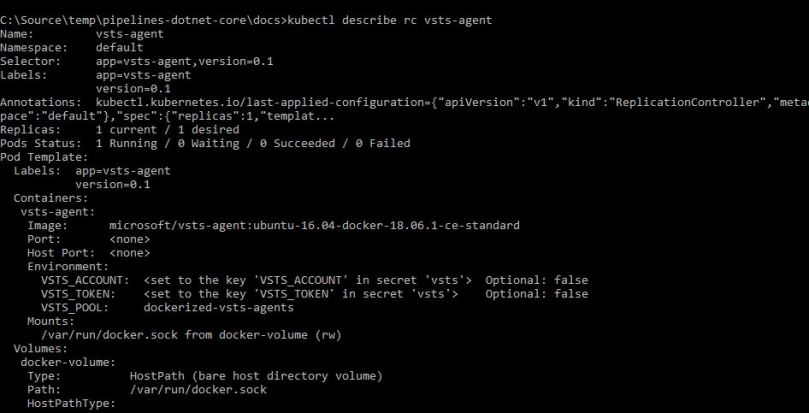
We can run below command to check if the Azure Pipeline or VSTS agent is running fine:
kubectl describe rc vsts-agent
You should be greeted with an output like below:
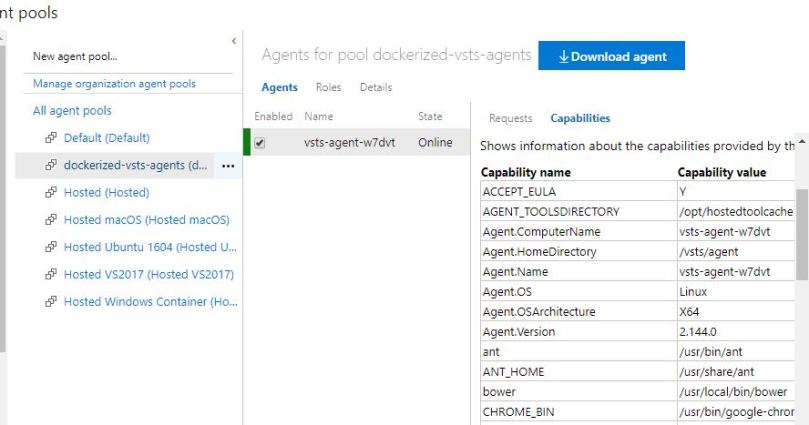
We should be able to see the agent in the pool as well:
Deploy Sample .NET Core Application for testing
For this, we can use source code from this repo. The respective Kubernetes configuration is covered inside file named docs/k8config.yml. It consists of a single service and an replicationcontroller:
This file contains bidirectional Unicode text that may be interpreted or compiled differently than what appears below. To review, open the file in an editor that reveals hidden Unicode characters.
Learn more about bidirectional Unicode characters
| apiVersion: v1 | |
| kind: Service | |
| metadata: | |
| name: dotnetcore | |
| labels: | |
| app: dotnetcore | |
| spec: | |
| type: ClusterIP | |
| ports: | |
| – port: 80 | |
| targetPort: 80 | |
| protocol: TCP | |
| name: http | |
| selector: | |
| app: dotnetcore | |
| — | |
| apiVersion: v1 | |
| kind: ReplicationController | |
| metadata: | |
| name: dotnetcore | |
| spec: | |
| replicas: 1 | |
| template: | |
| metadata: | |
| labels: | |
| app: dotnetcore | |
| spec: | |
| containers: | |
| – name: dotnetcore | |
| image: mohitgoyal.azurecr.io/dotnetcore:14 | |
| ports: | |
| – containerPort: 80 | |
| imagePullSecrets: | |
| – name: regcred | |
Do note that this pulls registry information from the kubernetes secrets named regcred. It can be created using below command:
kubectl create secret docker-registry regcred --docker-server=docker-registery-server --docker-username=reistry-user-id --docker-password=registry-user-password --docker-email=registry-user-email
Replace the values with appropriate values applicable for your enviornment.
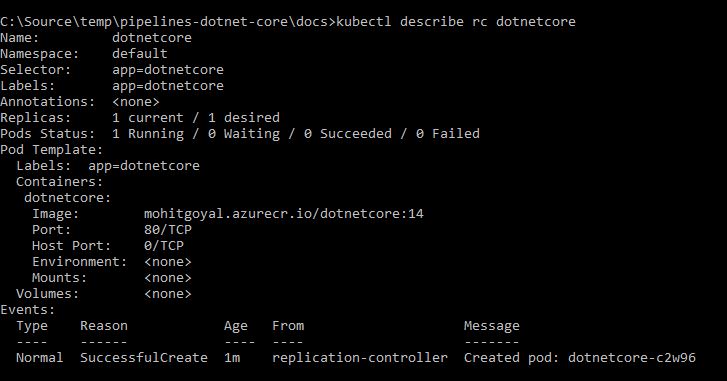
We can also verify if the application is deployed successfully by using kubectl describe rc , which should return an output like below:
Write a Sample test
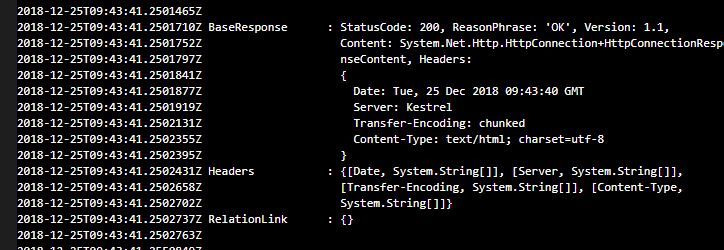
We can use below PowerShell code to test to invoke an HTTP request for the application and analyze the response:
$Response = Invoke-WebRequest -Uri "http://dotnetcore"
$Response | fl *
We would be particularly interested in $Response.StatusCode and a value of 200 should indicate that application is up and running fine. For the simplicity purpose, the above code has been left as such.
Run the Test Cases on Azure Pipeline Agent
We can run tests from either a build or a release in Azure Pipelines. Because integration and functional tests tend to run after an app is released to a certain environment, we’ll call the test from a release. The test files need to be available as artifacts from a build or from a source repository. Since in our case, we are running PowerShell based tests, we can use a PowerShell task and run inline-script. The important part of the release pipeline is to use the deployment job on the pool name that we created earlier.
Now if we did everything properly, we should be able to create a new release and the test should run successfully in the Kubernetes cluster:

The secret should be named as vsts, not registry (so that it matches what is in the step Deploy the VSTS Docker Agent on AKS).
LikeLike
[…] Step 1: Sign in to Azure Devops by using an account that is assigned the Administrator service connection securityrole.Note: Under Agent Phase, click Deploy Service Fabric Application. Click Docker Settings and then click ConfigureDocker settings. In Registry Credentials Source, select Azure Resource Manager Service Connection. Then select yourAzure subscription.Step 2: Create a personal access token..A personal access token or PAT is required so that a machine can join the pool created with the Agent Pools (read,manage) scope.Step 3: Install and register the Azure Pipelines agent on an Azure virtual machine.By running a Azure Pipeline agent in the cluster, we make it possible to test any service, regardless of type.References:https://docs.microsoft.com/en-us/azure/service-fabric/service-fabric-tutorial-deploy-container-app-with-cicd-vstshttps://mohitgoyal.co/2019/01/10/run-azure-devops-private-agents-in-kubernetes-clusters/ […]
LikeLike
thanks for this blog.
kubectl create secret generic registry
replace “registry” with “vsts”, as that is used in yaml
LikeLike
Plz clarify,
https://{VSTSAccountName}.visualstudio.com/DefaultCollection/{VSTSProject}/
what is required as VSTSACCOUNT is only the name, do not add .visualstudio.com suffix, will lead to pod crash.
LikeLike
If you scale the agent pod to say 5 replicas, does this automatically register additional agents in VSTS?
LikeLike
[…] to build container images. This functionality is also sometimes called inside Docker inside Docker. One of such use cases is explained here. To support this functionality, what people have to do, is to take the docker socket running on […]
LikeLike