One of the coolest things about Windows Azure Websites is the integration with source control, and the automated deployment hooks Azure offers. However, there are a number of small gotcha’s related to deployment, chief among these is the protection of confidential configuration items such as database connection strings. One of these gotchas is for connection string for entity framework, for which there is no native provider in Azure web app settings.
When you use Entity Framework to either build a database based upon the model you create in the VS Entity Designer, or use Entity framework to reverse-engineer a conceptual model from an existing database, it creates a bunch of meta-data mappings used to manage the interaction of your application with the database.
Unlike the “Code-First” approach, in which much of the meta-data exists as annotations on your model classes which Entity Framework then uses to create and map the relations of your classes to the database, the Model-First paradigm leaves you with straight POCO (“Plain Old CLR Objects” or, alternately, “Plain Old Class Objects”) classes.
In order for Entity Framework (and thus, your application) to work properly in a Model-First approach, it needs to know where all this meta-data lives, and this is evident in the connection string created by Entity Framework in your Web.config file. It should look like below:
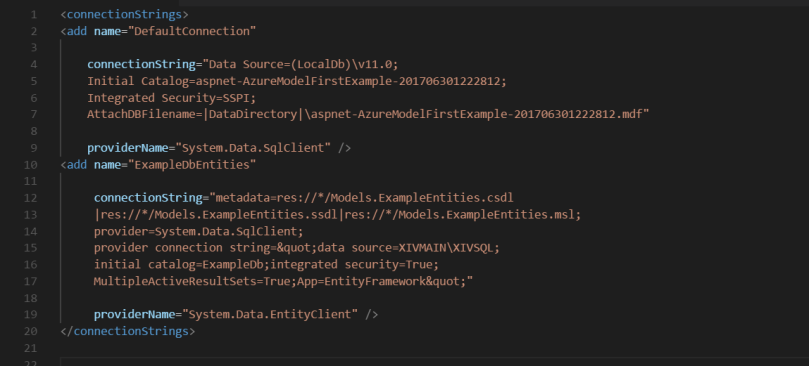
In the above, the first XML node in , named “DefaultConnection” is the connection string for the standard Forms Membership feature included out of the box with the default MVC project template.
The second node, for the connection string named “ExampleDbEntities” is what you get when you create an Entity Framework Model First implementation of the actual domain database your application will consume. All that metadata=res: stuff essentially tells Entity Framework where to find the meta data it needs to properly relate your generated model classes to database tables, and to keep track of the relationships between them.
In Azure Web App application settings, there are 4 values required for connecting string:
- Name
- Value
- Provider Type
- Slot Setting (Optional)

We need to provide these settings as below:
- Name – Name of the connection string (for example, this would be ‘ExampleDbEntities’ in our case)
- Value – All the information related to connection string. This should be in the format as below:
metadata=res://*/Models.ExampleEntities.csdl
|res://*/Models.ExampleEntities.ssdl|res://*/Models.ExampleEntities.msl;
provider=System.Data.SqlClient;
provider connection string="data source=XIVMAIN\XIVSQL;
initial catalog=ExampleDb;integrated security=True;
MultipleActiveResultSets=True;App=EntityFramework"
Make sure to remove any special characters like ‘"’ from string. Do note that we can choose to replace ‘"’ with double quotes or single quote.
- Provider type – Choose ‘Custom’ from list of drop down. It will not work for any other provider type.
- Check box for slot setting, if you want to specify that the mentioned connection string is only for the current slot.
Now, save the settings in the portal. However, you can not remove the connecting string from web.config entirely. If you would remove the connection string from web.config, you would get error like this:
The connection string ‘ExampleDbEntities’ in the application’s configuration file does not contain the required providerName attribute.”
So, you still need to keep the connection string in the web.config. However, just replace the actual connection string with dummy keyword. So it will look like this inside web.config:

Azure will inject correct value at runtime. So we need not worry about that.

Thanks man, that is only one correct answer in all results I have googled. Nobody telling to leave connection string in web.config but with dummy text…but it’s important. Appreciate:)
LikeLike
If you are not using integrated security you have to specify FALSE, along with user id and password
metadata=res://*/ExampleEntities.csdl|res://*/ExampleEntities.ssdl|res://*/ExampleEntities.msl;provider=System.Data.SqlClient;provider connection string=”data source=********.database.windows.net;initial catalog=PSR_SQL_SERVICE_UAT;integrated security=False;User Id=*****@********.database.windows.net;Password=*******;MultipleActiveResultSets=True;App=EntityFramework”
LikeLike
Its not working for me.I am putting below value in Azure App connection string
metadata=res://*/Models.GreatnessClubEntities.csdl
|res://*/Models.GreatnessClubEntities.ssdl|res://*/Models.GreatnessClubEntities.msl;
provider=System.Data.SqlClient;
provider connection string=”data source=tcp:ea2-b2cshared-stg-db-01.database.windows.net;
initial catalog=hsgreatnessclub-com-db-stg;integrated security=False;
user id=********;password=*********;
MultipleActiveResultSets=True;App=EntityFramework”
This value I am using in Web.Config
It is working from Web.Config but it is not taking the correct value from Azure App Settings Connection String.
Please give a solution
Thanks
LikeLike
Hi..this looks all right. There might be some character difference for double quotes or something else. Please check carefully.
LikeLike
This solution is not working for me.
metadata=res://*/wwtModel.csdl|res://*/wwtModel.ssdl|res://*/wwtModel.msl;provider=System.Data.SqlClient;provider connection string=”data source=****;initial catalog=****;persist security info=True;user id=****;password=*****;multipleactiveresultsets=True;application name=EntityFramework”;
Please reply
LikeLike
Hi wajahat.. The easiest way is to put your connection string inside web.config on your debug/development machine. If it works there, it should work in Azure too. Rest of the Azure configuration is fairly simple.
LikeLike